


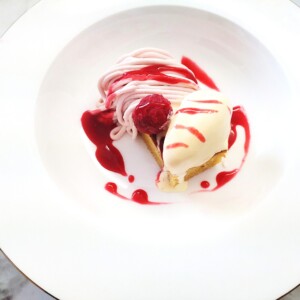


【レモンとヨーグルトムースのタルト】-Lemon and yogurt mousse tart-

レモンのすっきりとした風味が美味しい爽やかなタルトです◎ティータイムのお菓子にもおすすめです
材料(ホールサイズ15cm分)
【レモンの層】
- レモンカード *参照記事 全量(レモンの爽やかな味で幸せなお菓子の時間を◎レモンカード-Lemon curd- – lemoncooking10-料理ブログ-)
- 粉ゼラチン 3g
- 水 大さじ2
【ヨーグルトムース】
- 生クリーム 200cc
- グラニュー糖 30g
- 水切りヨーグルト 200g
- 粉ゼラチン 3g
- 水 大さじ2
【タルトの土台】
- クラッカー(ビスケットを使用しても◎) 100g
- 無塩バター(溶かしておきます) 50g
【飾り】
- 水切りヨーグルト 適量
作り方
1.初めにタルトの土台を作ります。クラッカーをジップロックの付いた袋に入れて、麺棒で粉上に砕きます。溶かしたバターを袋に入れて、クラッカーに馴染むようによく揉み合わせます。15cmの底の取れる型にバターと合わせたクラッカーを敷き詰め、ラップを被せてその上からココットなどのフラットな容器でしっかりと押さえて土台を作ります。型の上部にアルミなどを被せて、冷蔵庫で1時間以上冷やし固めます。
2.別記事参照のレモンカードを作り、冷蔵庫で冷やしておきます。
3.容器に水大さじ2を入れて、その上に粉ゼラチン3gを均等に振り入れます。5分間水でふやかした後に、湯煎して中のゼラチンを溶かしておきます。これを2つ分作っておきます。
4.ボウルに生クリームとグラニュー糖を入れて、6分立てに泡立てます。ほぐした水切りヨーグルトを加えて混ぜ合わせ、溶かしたゼラチン1つ分を加えて、軽く角が立つまで混ぜ合わせます。タルトの型を冷蔵庫から取り出します。型の高さに切ったクッキングシートを型の内側に巻き、ヨーグルトのムースを中央から注ぎ入れます。スプーンやピックなどでムースを端まで詰め、上部をフラットにならしたら、少し冷蔵庫に入れて冷やします。
5.レモンカードをボウルに入れて、溶かしたゼラチンの2つ目を入れてよく混ぜ合わせます。ヨーグルトムースの型を冷蔵庫から取り出し、スプーンなどでレモンカードを優しく注ぎ入れます。レモンカードの表面をスプーンなどでフラットにしたら、型にアルミホイルを被せ、冷蔵庫で1時間以上冷やし固めます。
6.1時間以上経ったら、冷蔵庫からタルトを取り出します。型の周囲を温かくした布巾などで少し温めた後に、タルトを型から取り外します。テーブルナイフ等で型の底とタルトの間に隙間を作り、タルトをお皿に置いてクッキングシートをそっと外します。
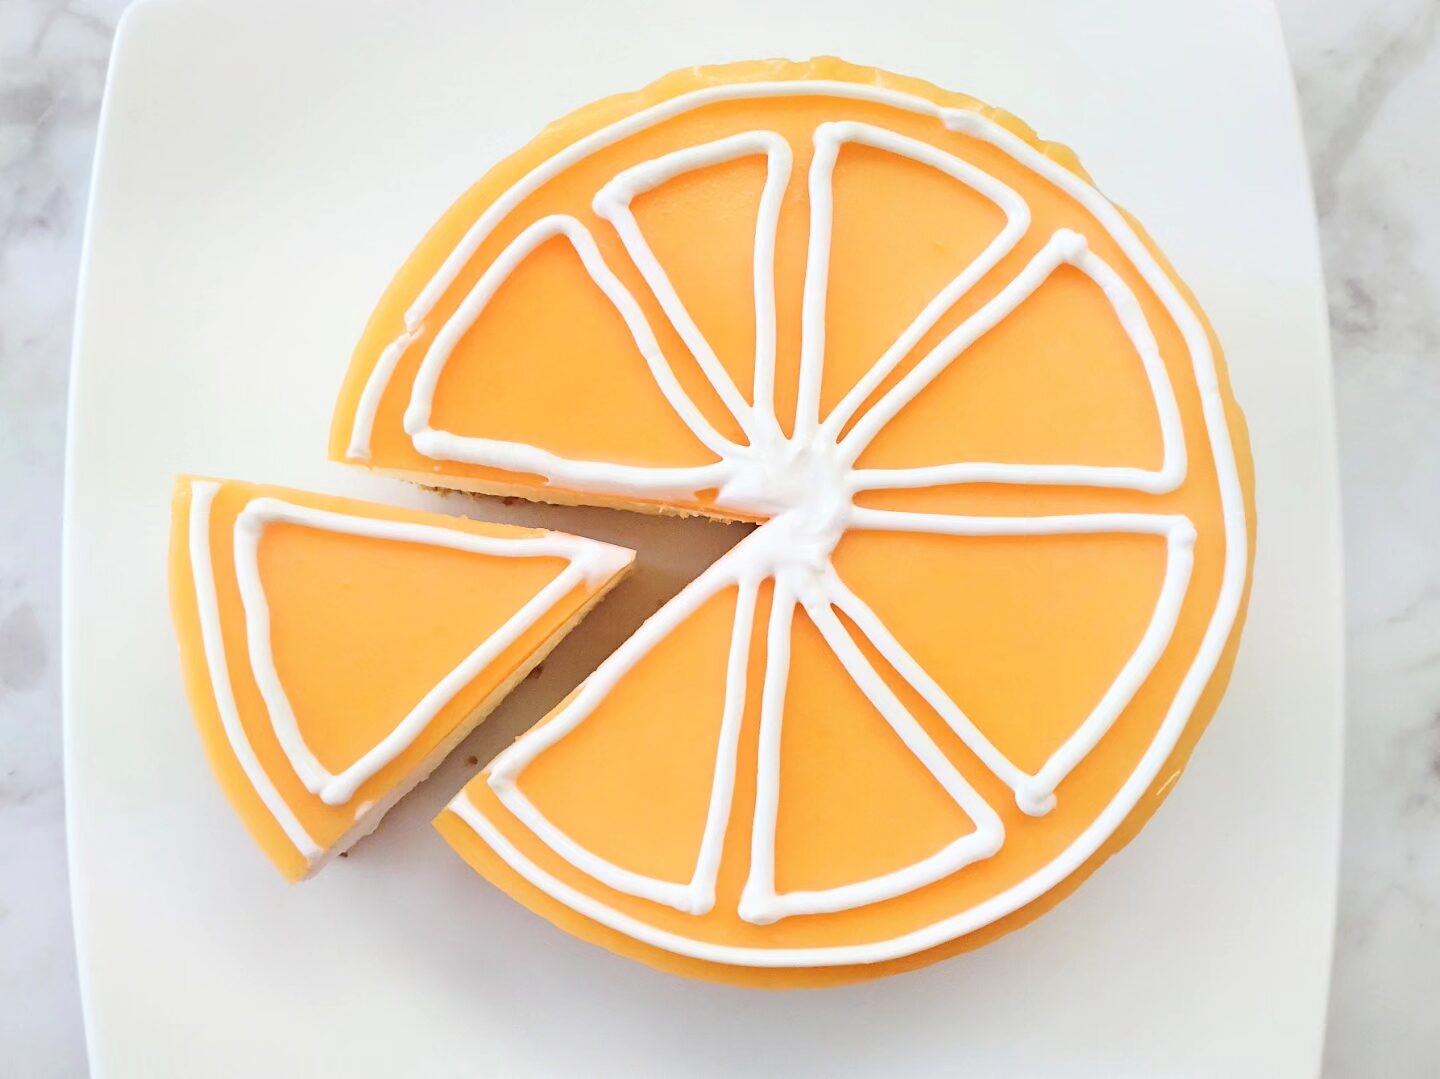
7.仕上げに飾り付けをします。水切りヨーグルトを小さな丸の口金をセットした絞り袋に入れて、レモンの模様を描いていきます。模様が描けたら、タルトの完成です。
盛り付けポイント
◆〈レモンの模様の描き方〉縁取りの円を描いた後に、1本の横線を増やしたアスタリスクを意識しながら三角を作っていくと、レモンの模様が描きやすいです。このレシピ以外のお料理のときでも、レモンの模様を描く際にお役立てください。
English translation
Ingredients (for a 15cm whole cake)
【Lemon layer】
- Lemon curd *Reference article: Entire amount ( Enjoy a delightful sweet treat with the refreshing taste of lemon ◎ Lemon curd – lemoncooking10 – Cooking Blog – )
- 3g of powdered gelatin
- 2 tablespoons of water
【Yogurt Mousse】
- 200cc of heavy cream
- 30g granulated sugar
- 200g strained yogurt
- 3g of powdered gelatin
- 2 tablespoons of water
【Tart base】
- Crackers (biscuits can also be used) 100g
- 50g unsalted butter (melted)
【decoration】
- Strained yogurt (appropriate amount)
How to make it
1. First, make the tart base. Place the crackers in a resealable bag and crush them into a powder using a rolling pin. Add the melted butter to the bag and knead well until the butter is evenly distributed over the crackers. Press the butter-crusted crackers into a 15cm springform pan, cover with plastic wrap, and press firmly with a flat container such as a ramekin to create the base. Cover the top of the pan with aluminum foil or similar material and chill in the refrigerator for at least one hour to set.
2. Prepare the lemon curd as described in the separate article and chill it in the refrigerator.
3. Put 2 tablespoons of water into a container, and sprinkle 3g of powdered gelatin evenly over it. Let it soak in water for 5 minutes, then melt the gelatin inside by heating it in a double boiler. Prepare two of these.
4. In a bowl, combine the heavy cream and granulated sugar and whip until soft peaks form. Add the loosened strained yogurt and mix well. Add one packet of melted gelatin and mix until soft peaks form. Remove the tart pan from the refrigerator. Line the inside of the pan with parchment paper cut to the height of the pan, and pour the yogurt mousse into the center. Use a spoon or pick to fill the mousse to the edges, smooth the top, and refrigerate briefly to chill.
5. Place the lemon curd in a bowl, add the second portion of melted gelatin, and mix well. Remove the yogurt mousse mold from the refrigerator and gently pour the lemon curd into it with a spoon. Smooth the surface of the lemon curd with a spoon, then cover the mold with aluminum foil and chill in the refrigerator for at least 1 hour to set.
6. After at least an hour, remove the tart from the refrigerator. Gently warm the outside of the mold with a warm cloth, then remove the tart from the mold. Use a table knife or similar tool to create a gap between the bottom of the mold and the tart, then place the tart on a plate and carefully remove the parchment paper.
7. Finally, decorate. Put the strained yogurt into a piping bag fitted with a small round nozzle and draw lemon patterns. Once the patterns are drawn, the tart is complete.
Food Presentation
◆〈How to draw a lemon pattern〉 After drawing a circle for the outline, create triangles while keeping in mind an asterisk by adding one horizontal line. This makes it easier to draw a lemon pattern. Please use this when drawing lemon patterns in dishes other than this recipe as well.