


【 La boulangerie à la maison 】素材の味が美味しい、じっくりと発酵させた本格的な手ごねパンのレシピ◎ ふんわりとした優しい甘さのパンが作れます -Soft round bread with gentle sweetness-
美味しい出来立てのパンで、笑顔が溢れる幸せな食卓時間を◎ あたたかいパンとお料理を食卓に並べておうちでビッフェをしたり、優雅なブランチをするのもオススメです
材料(6~9個分程)
【パン生地】
- 強力粉 200g
- キビ糖 大さじ2
- インスタントドライイースト 3g
- 塩 1g
- 卵(Mサイズ) 1個
- ミルク 100cc
- 打ち粉(強力粉) 少々
- 無塩バター(常温に戻しておく) 15g
【ドリュール液】
- 卵黄 1個分
- 水 大さじ1
【準備】ドリュール液は、容器に卵黄と水を入れてよくかき混ぜ、こし器で濾します。使用する時までラップをして冷蔵庫に入れておきます。
作り方
1.【パン生地】ボウルを用意して強力粉を入れます。キビ糖を強力粉の上に1か所配置して、そのすぐ横にドライイーストを置きます。その反対側に塩を配置します。*食材をこの配置にすると、パン生地が安定して膨らみます。
卵を別のボウルに入れてよく溶いておきます。ミルクパンにミルクを入れて、弱火で人肌温度(35℃位)に温めます。次に先程の溶き卵を塩の場所に注ぎます。すぐに温めたミルクをドライイーストの部分に注ぎ、スプーンでミルクとキビ糖を軽くかき混ぜてから生地全体を素早く混ぜ合わせます。生地がスプーンで混ぜれない状態になったら、手で粉感が無くなるまで生地の全体をこねます。
2.ペストリーボードや木製のまな板(まな板のとき、下に濡れ布巾を置くと捏ねやすくなります)等の上に打ち粉を軽く振ります。その上に生地を取り出し、手のひらで生地をこすりつけるようにして、前後に大きく生地を伸ばし捏ねます。時々、手に付いた生地をスケッパーで離して生地に戻したり、ボードやまな板についた生地をスケッパーでまとめたりしながら、10分間捏ね続けます。
バターを生地の中央に置いて包み、生地の全体を何度も握るようにして馴染ませます。その後、前後に生地を伸ばし5分間、捏ね続けます。生地を捏ね続けている内に、自然と生地がくっつかなくなってまとまり、なめらかな生地になっていきます。捏ねあがりのチェックとして、両手の指で生地の端を少し引っ張り、柔らかく薄い膜が出来たら完了です。*生地が伸びずにちぎれる場合は、グルテンがイーストに足りない状態です。生地を捏ねる時間を増やして対応してください。
3.〈第一次発酵〉生地の表面をなめらかに丸くまとめ、生地をボウルに入れて、乾燥しないようにボウルにラップをします。オーブンレンジなどの発酵機能を使用して、35℃の温度設定で50分~1時間ボウルに入れた生地を発酵させます。*発酵の基準として、生地が2倍の大きさに膨らめば、第一次発酵は完了です。
4.〈フィンガーテスト/ガス抜き/等分〉ボウルのラップを外して、フィンガーテストを行います。強力粉を人差し指につけて生地の中央に入れて離した際に、生地に穴がそのまま残るなら最適な発酵の状態です。
次に生地のガス抜きと等分を行います。準備として等分用にクッキングシートを台などに敷いておきます。ボウルに入っている生地の真ん中を手でゆっくりと押し、生地の中のガスを抜きます。生地の周囲を中央に寄せるようにして浮かし、生地をボウルから取り出してクッキングシートの上に置きます。生地の中央から外側に向かい、両手で優しく生地を押してガスを抜いていきます。生地を楕円状もしくは丸にまとめて、スケッパーなどで垂直に生地を切り(生地が傷むため、切り分ける際は1か所につき1回で切ります。)6~9等分します。*パンの完成時に、生地を切り分けた時より2倍程に膨らみます。お好みの大きさをお選びください。
等分した生地を手のひらに乗せて、もう片方の手で生地の下側を内側に向かって押すようにして、生地の表面が張るようにしながら丸めます。時計回りに生地を動かして数回続けます。なめらかに生地の表面が張って丸くまとまれば、生地の下を指で軽く閉じます。
5.〈ベンチタイム〉天板にクッキングシートやオーブンシートを敷き、先ほどの丸めた生地を均等に間をあけて置きます。固く絞った濡れ布巾を生地全体に被せて乾燥を防ぎ、生地を15分休ませます。
6.〈二次発酵〉 ベンチタイム後、再度生地からガスを抜きます。手のひらに生地を1つ乗せ、もう片方の手のひらで生地を優しく押してガスを抜きます。等分後に実施した要領で生地を丸くなめらかに形成して、天板にすべての生地を均等に並べます。オーブンレンジなどの発酵機能を35℃に設定して、生地を置いた天板を入れて50分~1時間発酵させます。*生地が2倍の大きさに膨らめば、第二次発酵は完了です。
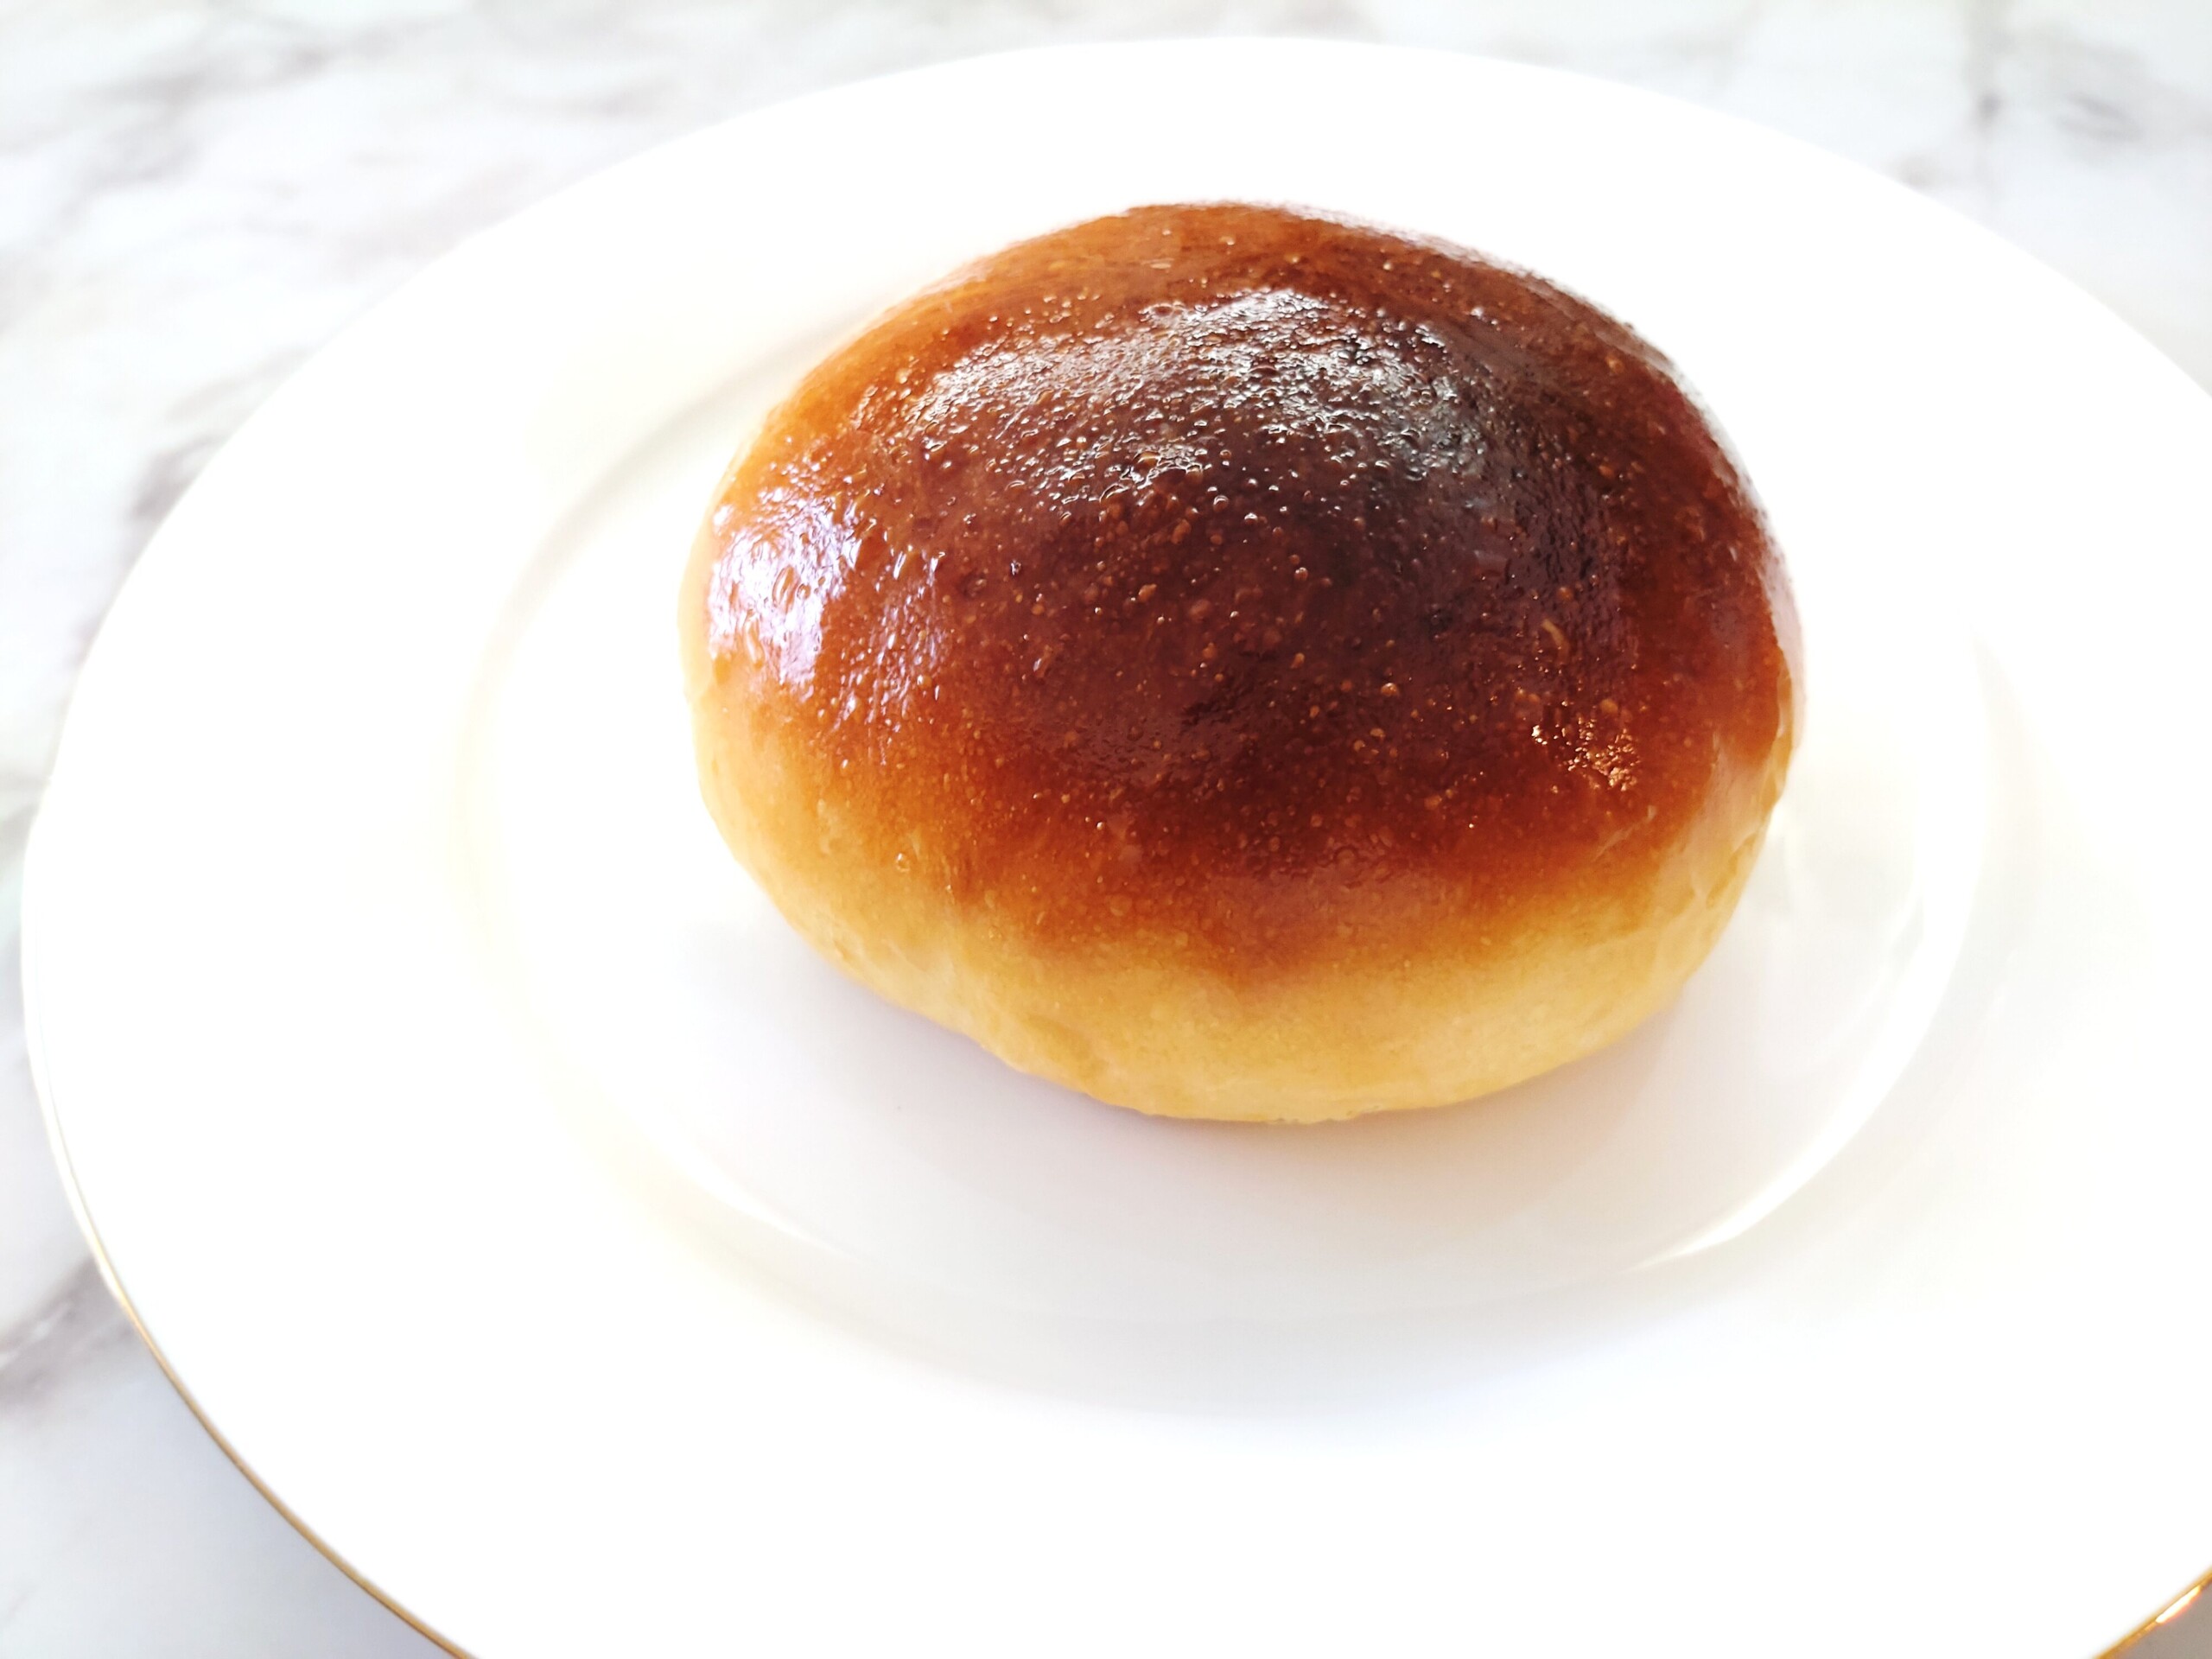
7.〈焼成〉オーブンを200℃に予熱します。予熱している間に、ドリュール液を柔らかい刷毛で生地に優しく塗ります。刷毛を斜めにして塗ると生地が傷みません。また、塗り残しがないように上から下まで生地全体に薄く塗ると美しく仕上がります。予熱ができたら200℃で14分程度、パン生地をオーブンに入れて焼成します。*オーブンによって、焼成時間や温度を微調整してください。
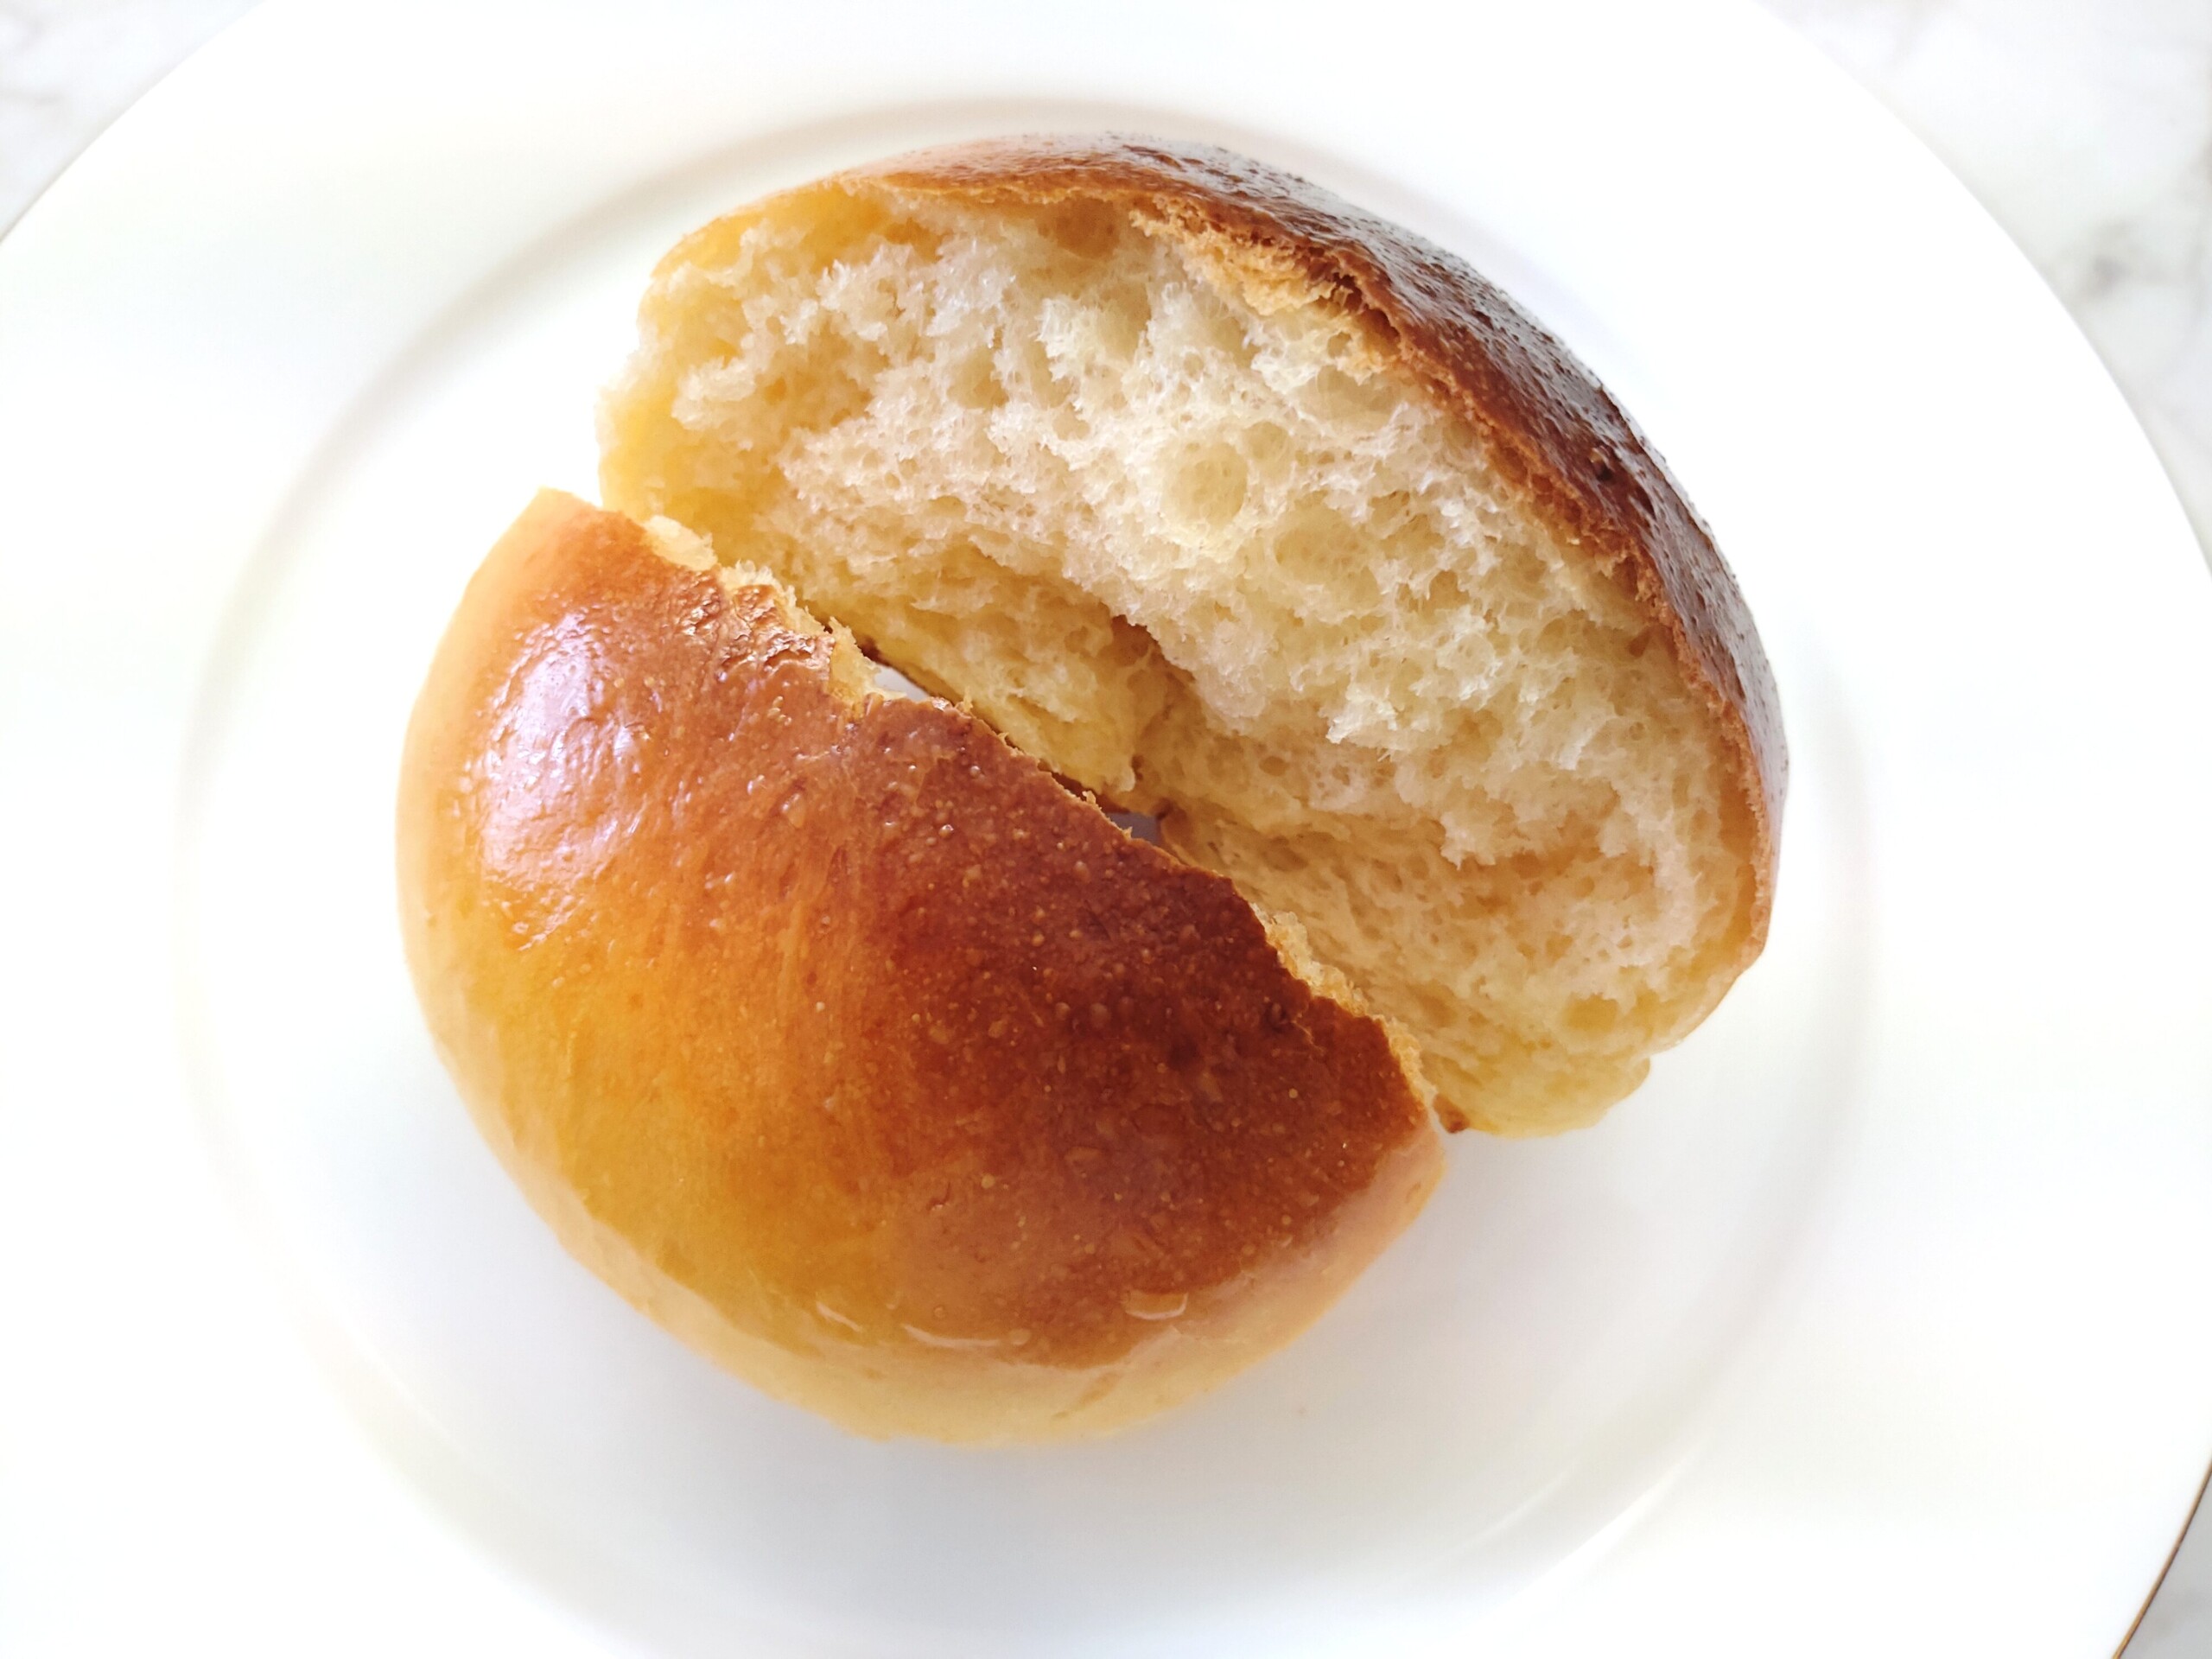
パンがこんがりとして美味しそうな色になれば出来上がりです。
◆初めてパンが完成したら、まずは大切な人たちと食べて、出来立ての風味豊かな美味しさを味わってみてください。その後は、お好みでバターやジャム等をパンにつけても美味しく頂けます。
◆本レシピのパン生地は、万能パンになるように考案しました。そのままパンの風味を味わったり、お料理と一緒に頂いたり、菓子パンやおかずパンとしてアレンジすることもできます。アレンジするときは、ベンチタイム後の形成の時にフィリングを加えると良いです。
◆〈食卓の工夫〉パンの発酵時間の間に他の料理のメニューを作っておき、パンの焼き上がりに合わせて食卓に並べると、お家で大切な人たちとビッフェを楽しむことができます。
English translation
Ingredients (for 6-9 servings)
【Bread dough】
- 200g strong flour
- 2 tablespoons of brown sugar
- Instant dry yeast 3g
- 1g salt
- One medium-sized egg
- 100cc of milk
- A little dusting flour (strong flour)
- Unsalted butter (at room temperature) 15g
【Drewol solution】
- One egg yolk
- 1 tablespoon of water
【Preparation】 To make the egg wash, put the egg yolks and water in a container and mix well, then strain it through a sieve. Cover with plastic wrap and refrigerate until ready to use.
How to make it
1. 【Bread Dough】 Prepare a bowl and add the bread flour. Place the brown sugar in one spot on top of the bread flour, and place the dry yeast right next to it. Place the salt on the opposite side. *Arranging the ingredients in this way will help the bread dough rise evenly.
Beat the eggs well in a separate bowl. Pour the milk into a saucepan and warm it over low heat to body temperature (about 35°C). Next, pour the beaten eggs over the salt. Immediately pour the warmed milk over the dry yeast, lightly stir the milk and brown sugar with a spoon, and then quickly mix the entire dough together. Once the dough is too thick to mix with a spoon, knead the entire dough with your hands until there is no more dry flour remaining.
2. Lightly sprinkle flour on a pastry board or wooden cutting board (if using a cutting board, placing a damp cloth underneath will make kneading easier). Place the dough on top and knead it by rubbing it with your palms and stretching it back and forth. Continue kneading for 10 minutes, occasionally using a dough scraper to separate any dough that has stuck to your hands and return it to the dough, or using the scraper to gather any dough that has stuck to the board or cutting board.
Place the butter in the center of the dough and wrap it up, then knead the dough by squeezing it repeatedly. After that, stretch the dough back and forth and continue kneading for 5 minutes. As you continue kneading, the dough will naturally stop sticking together and become smooth. To check if it’s done, gently pull the edge of the dough with your fingers on both hands; if a soft, thin membrane forms, it’s done. *If the dough tears instead of stretching, it means the yeast doesn’t have enough gluten. Increase the kneading time to address this.
3. <First Fermentation> Smooth the surface of the dough and shape it into a ball. Place the dough in a bowl and cover the bowl with plastic wrap to prevent it from drying out. Using the fermentation function of an oven or microwave oven, set the temperature to 35°C and let the dough in the bowl ferment for 50 minutes to 1 hour. *As a guideline for fermentation, the first fermentation is complete when the dough has doubled in size.
4. <Finger Test/Degassing/Dividing> Remove the plastic wrap from the bowl and perform the finger test. Dip your index finger in bread flour and place it in the center of the dough. When you release it, if the hole remains in the dough, the dough is in the optimal fermentation state.
Next, we will degas the dough and divide it into equal portions. As preparation, lay a sheet of parchment paper on a surface for dividing the dough. Gently press the center of the dough in the bowl with your hand to release the gas. Lift the dough by gathering the edges towards the center, remove the dough from the bowl, and place it on the parchment paper. Starting from the center of the dough and moving outwards, gently press the dough with both hands to release the gas. Shape the dough into an oval or round, and cut it vertically with a dough scraper or similar tool (cut only once in each place to avoid damaging the dough) to divide it into 6 to 9 equal portions. *The dough will expand to about twice its size when the bread is finished. Choose your preferred size.
Place the divided dough in the palm of your hand, and with your other hand, press the bottom of the dough inward, making sure the surface is taut as you roll it into a ball. Continue this process several times, moving the dough clockwise. Once the surface of the dough is smooth and it forms a ball, gently close the bottom with your fingers.
5. <Bench Time> Line a baking sheet with parchment paper or oven paper and place the rolled dough pieces evenly on it, leaving space between them. Cover the dough with a tightly wrung damp cloth to prevent it from drying out, and let it rest for 15 minutes.
6. <Second Fermentation> After the bench time, release the gas from the dough again. Place one piece of dough in the palm of your hand and gently press it with the palm of your other hand to release the gas. Shape the dough into a smooth, round shape using the same method as when dividing it into equal portions, and arrange all the dough evenly on the baking sheet. Set the fermentation function of your oven or microwave to 35°C, place the baking sheet with the dough inside, and let it ferment for 50 minutes to 1 hour. *The second fermentation is complete when the dough has doubled in size.
7. <Baking> Preheat the oven to 200°C. While the oven is preheating, gently brush the dough with egg wash using a soft brush. Applying the wash at an angle will prevent damage to the dough. Also, apply a thin layer from top to bottom to the entire surface of the dough to ensure a beautiful finish. Once the oven is preheated, place the dough in the oven at 200°C and bake for about 14 minutes. *Adjust the baking time and temperature as needed depending on your oven.
The bread is ready when it’s golden brown and looks delicious.
◆Once your first batch of bread is finished, first try it with your loved ones to savor the fresh, flavorful taste. Afterwards, you can enjoy it with butter, jam, or other toppings of your choice.
◆This recipe’s dough is designed to be a versatile bread. You can enjoy its flavor on its own, serve it with meals, or use it to make sweet or savory breads. When making variations, it’s best to add the filling when shaping the dough after the bench rest.
◆〈Table setting ideas〉Prepare other dishes while the bread is rising, and then serve them at the table when the bread is ready. This allows you to enjoy a buffet at home with your loved ones.